This post may contain affiliate links, please read our disclosure policy for details.
Peppermint and chocolate will forever be one of my favorite seasonal flavor combinations. This peppermint chocolate cake captures the best of both flavors with a rich, deeply chocolatey cake paired with a cool hint of peppermint that feels made for the holidays. It’s a classic flavor combo that’s both comforting and indulgent, like your favorite seasonal treat turned into a cake.
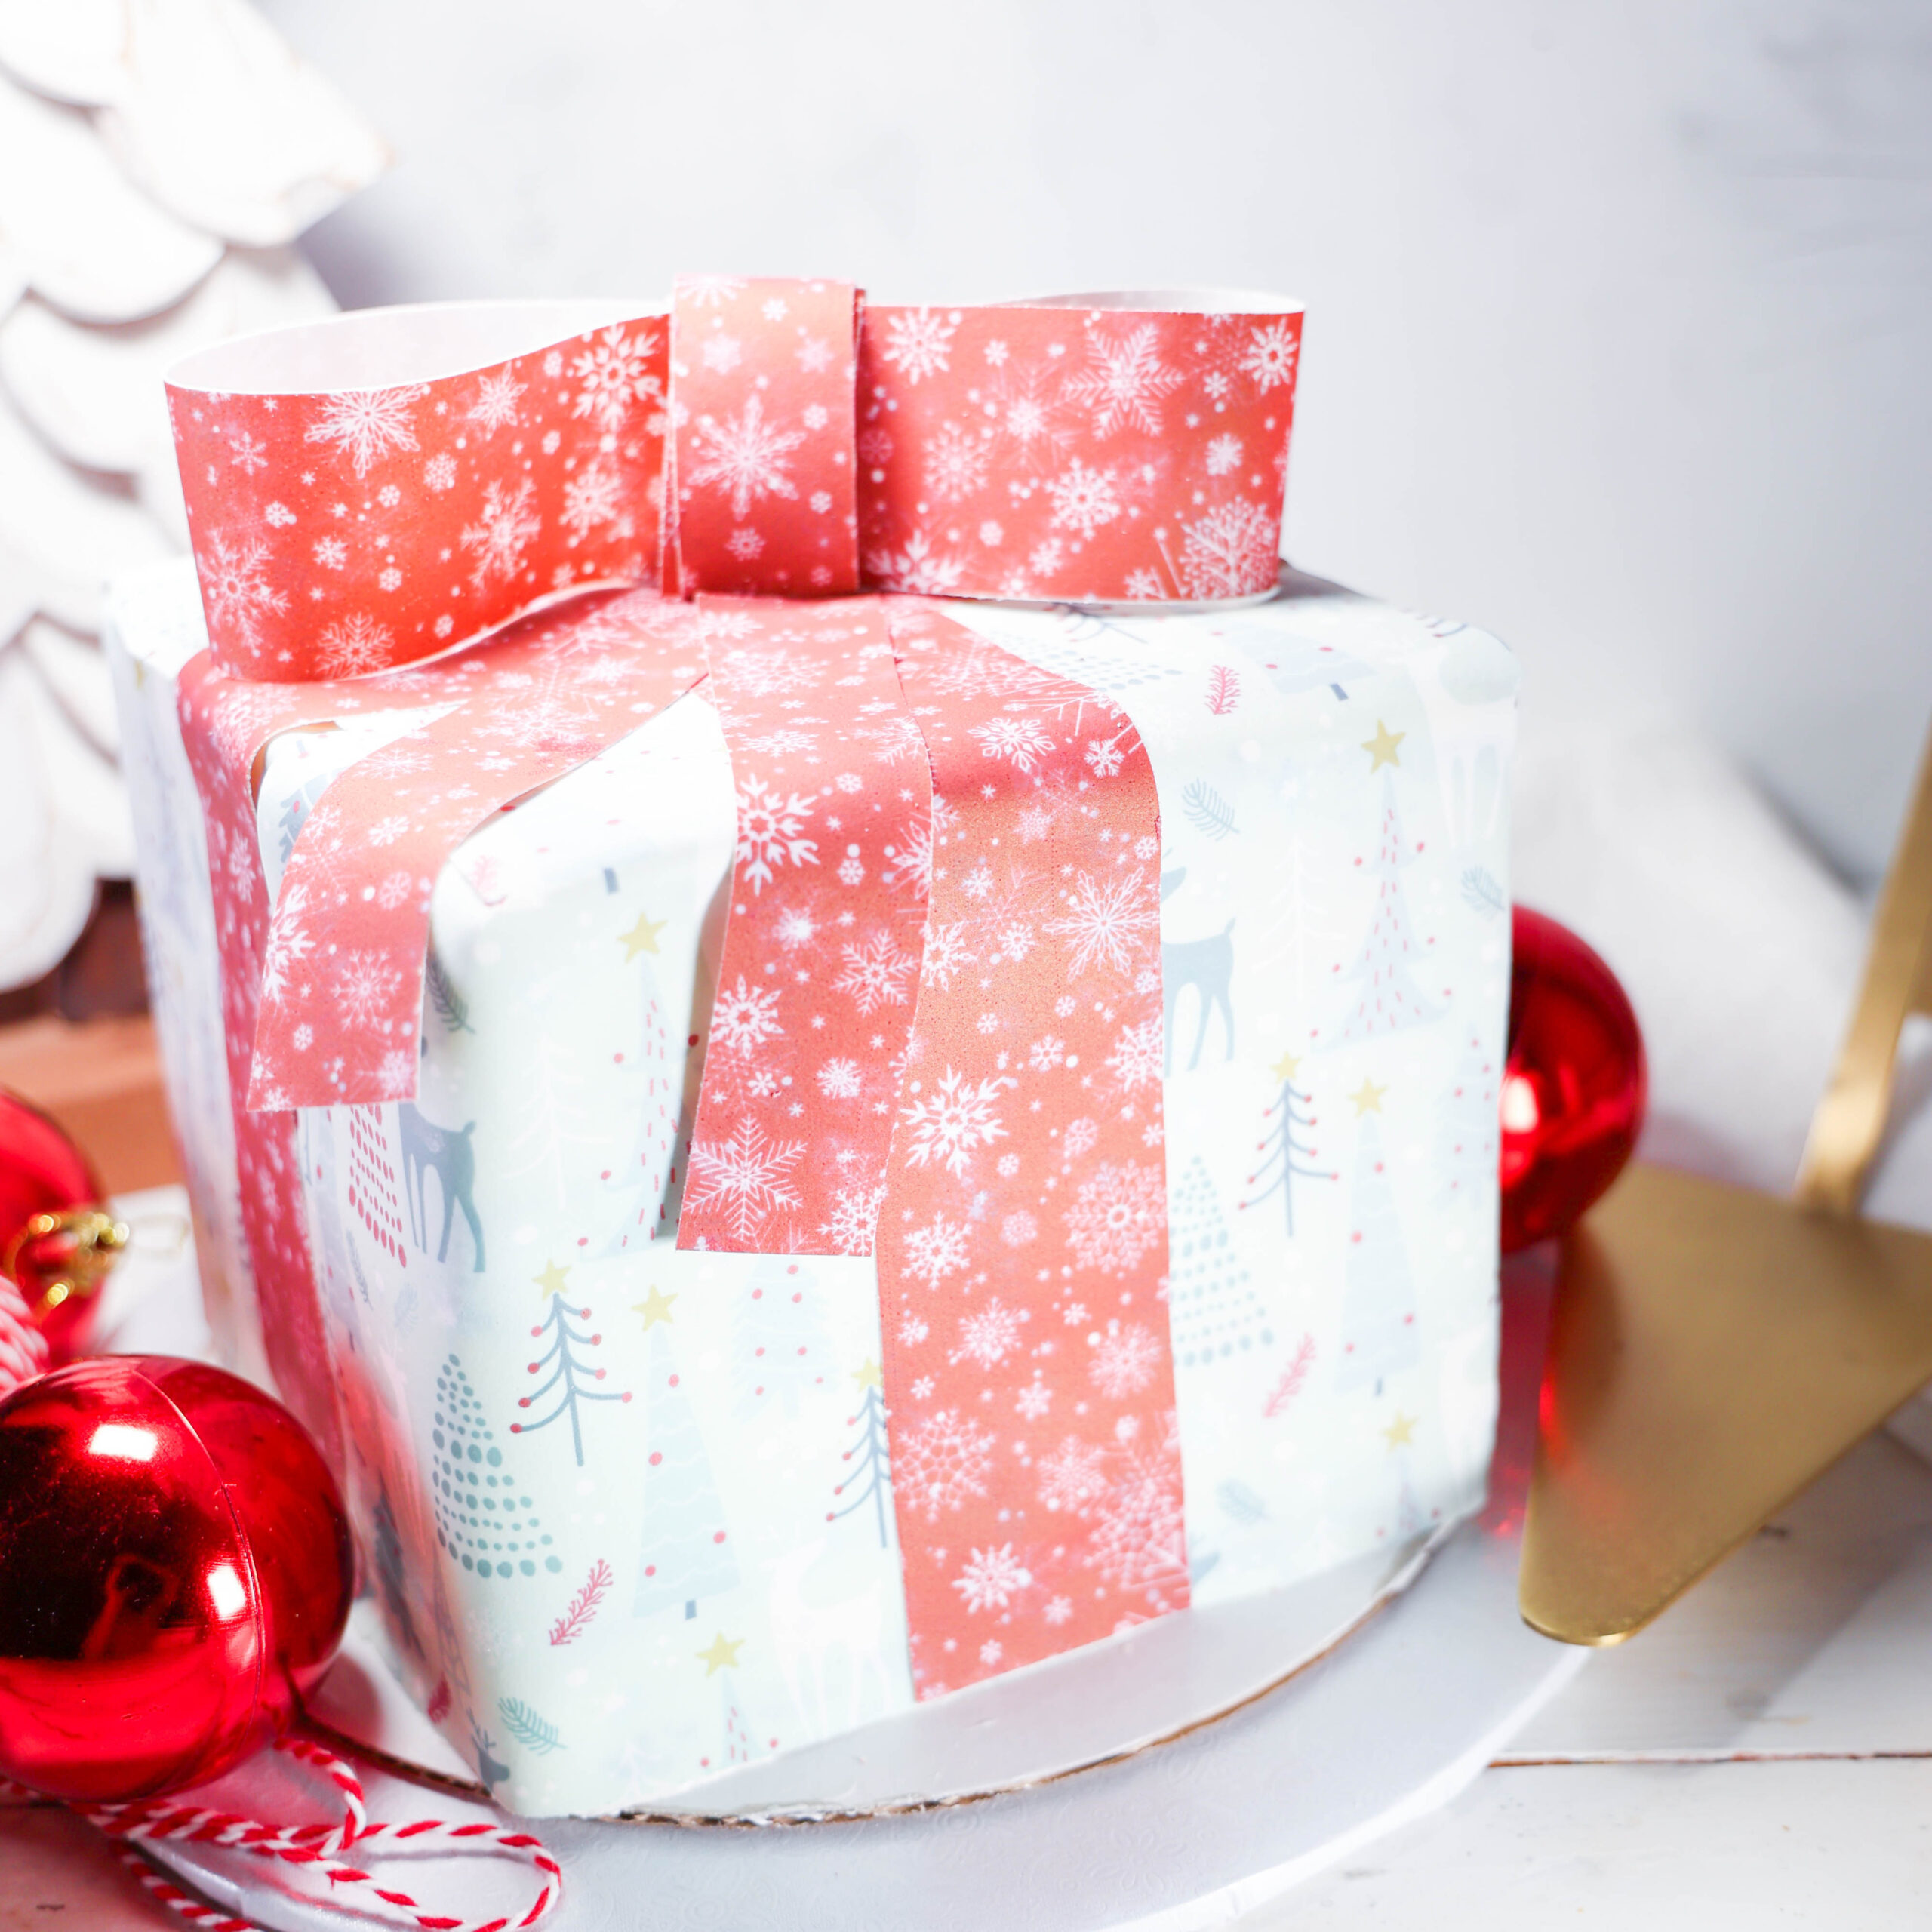
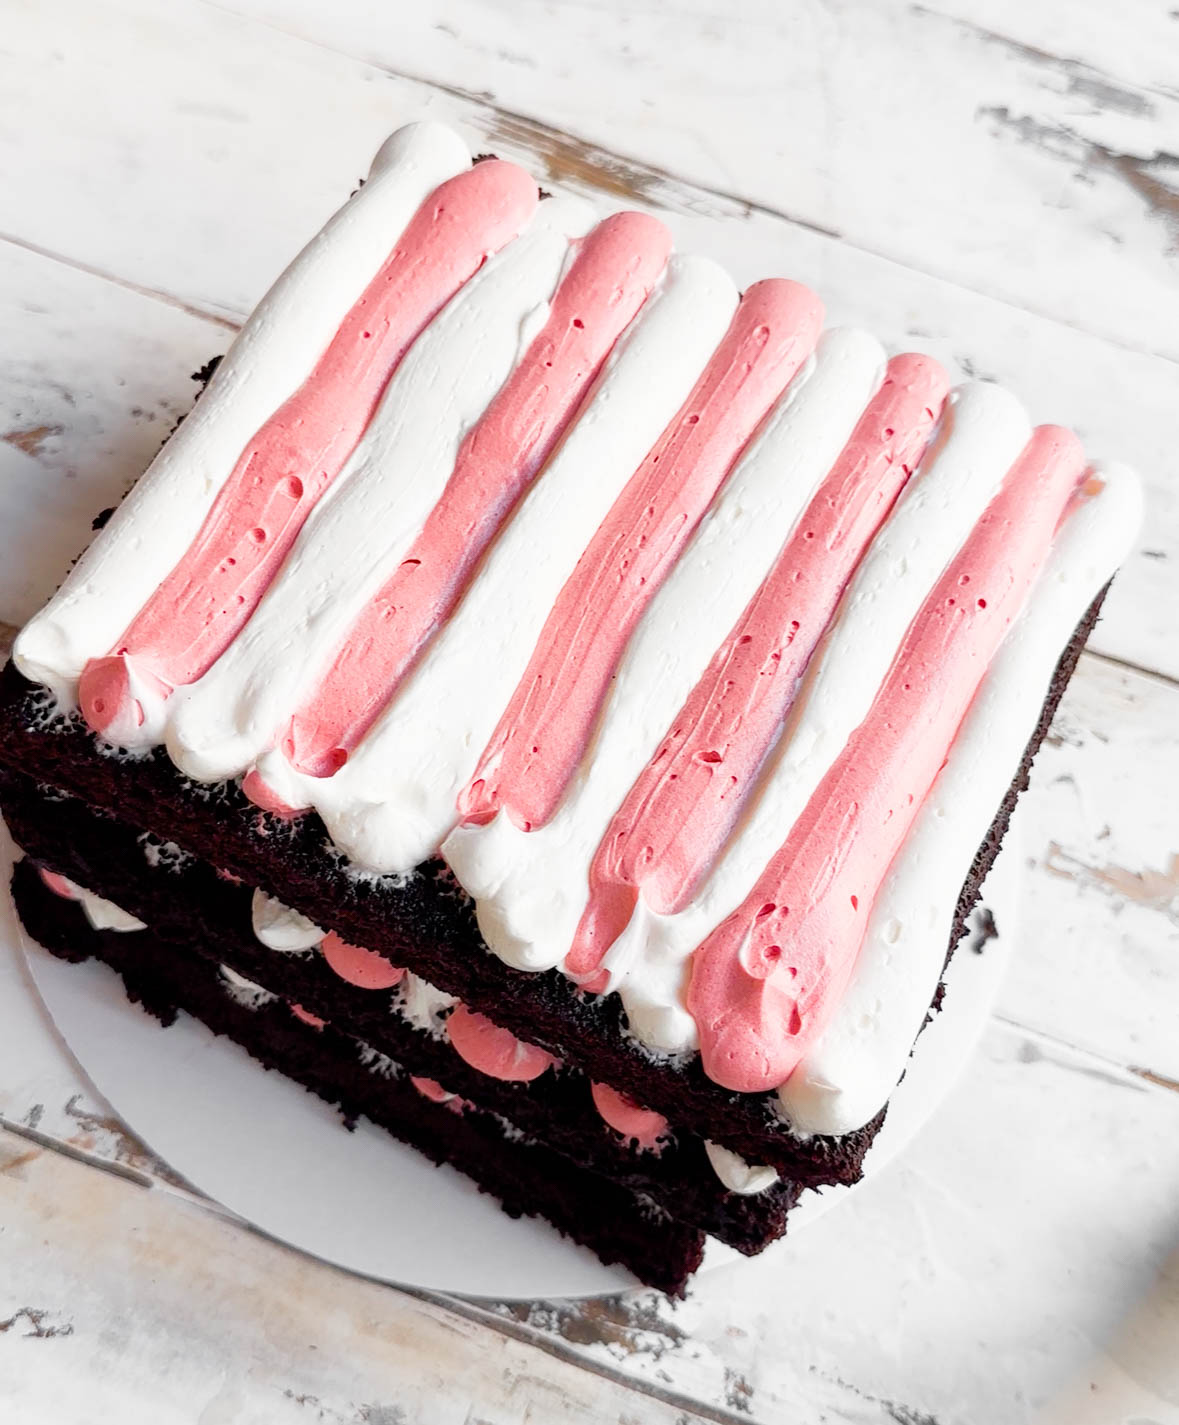
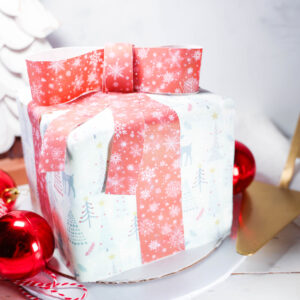
Despite its show-stopping flavor, this cake is surprisingly simple to make. The cake bakes quickly and evenly thanks to the use of a half sheet pan, and it achieves a ‘wow’ factor cross-section from piping simple stripes of buttercream. Covering the cake in icing sheets makes this cake look like a wrapped gift that could fit under the Christmas tree undetected! Prepare for some moments of shock and awe from your friends and family.
It’s the perfect choice for holiday celebrations, cozy winter baking, or anytime you’re craving something festive, chocolatey, and just a little bit special.
Why You’ll LOVE This Cake
Here’s what you’ll need:
Peppermint Chocolate Cake Tips
Measure precisely. To get a final product that looks convincingly like a gift, we need even cake layers of the same size. Use a ruler to measure and cut the sheet cake into identical squares, and be careful to align layers when stacking/assembling. Give it one last check before putting it into the fridge to chill!
Swiss meringue buttercream. Using an instant-read thermometer is my preferred way to check the temperature before whipping the egg whites and sugar. However, you can also rub a bit between your fingers to check for graininess. We’re looking for fully dissolved sugar, which will ensure our meringue whips up fully and smoothly. When adding the cubed butter, it is very important that the butter is at room temperature. We need the butter to quickly incorporate into the meringue, and cold butter simply will not do this. Once finished adding the butter, if the buttercream appears curdled/split, simply continue mixing, and it should come together to a smooth/glossy finish.
How to work with icing sheets. Treat these like very thin layers of fondant (which they essentially are). Keep the sheets at room temperature and sealed in an airtight bag/wrapped airtight until ready for use. To use the sheets, you will simply cut them to your desired size, remove the backing, and press the sheets gently into the cake (aligning to the bottom of the cake first), pattern side facing out. The sheets will likely be taller than your cake. At the corners, you will cut the sheets vertically down to create two flaps that will fold onto the top of the cake neatly (it’s ok that they will overlap). At the end, the bow you create will cover and hide the overlapping flaps.
How to make this peppermint chocolate cake:
- Make the peppermint chocolate cake: Preheat oven to 350°F, and prepare half sheet pan. Mix ingredients, pour batter into prepared pan, and bake until toothpick comes out clean, approximately 20 minutes. Set aside to cool, and once cool, cut into 6 identical squares (only 5 will be used for the assembly).
- Make peppermint Swiss meringue buttercream: Combine egg whites and sugar over hot water bath and heat until 160°F, whisking constantly. Whip to a stiff peak, and then switch to a paddle attachment and add room temperature cubed butter, mixing until smooth and glossy. Add vanilla and peppermint, and then add powdered sugar and red gel food coloring to roughly half.
- Assembly: Place first cake layer on a board, and pipe alternating white and red stripes of buttercream. Repeat with remaining layers, ending with a cake layer (you will have 1 cake layer ‘extra’). Mark where the ‘front’ of the cake is, and then crumb coat the cake. Put cake in the fridge to chill. Add icing sheets to chilled cake. Construct bow and adhere to cake.
FAQ
Shop The Tools I Use
“Is the cake inside the gift? OMG, the cake is the gift?!” – Mark L.
Peppermint Chocolate Cake
Ingredients
Peppermint Chocolate Cake
- 225 grams all-purpose flour
- 325 grams granulated sugar
- 70 grams Dutch-processed cocoa powder, sifted
- 1 tsp baking soda
- 2 tsp baking powder
- 1 tsp salt
- 65 grams vegetable oil
- 200 grams buttermilk, room temperature
- 100 grams whole egg (approx. 2 large eggs)
- 2 tsp vanilla extract
- 1 tsp peppermint extract
- 200 ml hot water
- 2 tsp espresso powder
Peppermint Swiss Meringue Buttercream
- 200 grams egg white
- 400 grams granulated sugar
- 454 grams unsalted butter, cubed, room temperature
- 1 tsp vanilla bean paste (or extract)
- 1 1/2 tsp peppermint extract
- 1 tbsp powdered sugar
- Red gel food coloring
Assembly
- 5-6 icing sheets (I get mine from https://www.sugar-art.ca/collections/icing-frosting-paper)
- Edible glue / fondant glue
Instructions
Peppermint Chocolate Cake
- Preheat oven to 350ºF, and grease and line a half sheet pan with parchment. Set aside.
- In a medium bowl, whisk together all-purpose flour, granulated sugar, Dutch-processed cocoa powder, baking soda, baking powder, and salt. Set aside.
- In a separate large bowl, whisk together vegetable oil, buttermilk, eggs, vanilla extract, and peppermint extract. Combine hot water with espresso powder (or simply use hot coffee instead), and add to wet mixture in two batches, whisking to incorporate after each addition.
- To the wet mixture, add dry ingredients and whisk together until fully combined (just until there are no visible dry pockets of flour).
- Pour batter into prepared half sheet pan, and bake until a toothpick inserted in the middle comes out clean, approximately 20 minutes. Remove from oven and set aside to cool.
Peppermint Swiss Meringue Buttercream
- Add egg whites and granulated sugar in a medium, heat-proof bowl, and whisk until combined.
- Add a thin layer of water to a medium pot, and place over medium heat on the stove until steaming. Place bowl with egg whites and sugar on top, being sure that the water does not reach the bottom of the bowl. Whisk constantly until mixture heats to 160ºF on an instant-read thermometer and is no longer grainy when rubbed between your fingers.
- Transfer mixture to the bowl of a stand mixer fitted with a whisk attachment, and whisk on medium-high speed until stiff peaks are formed and the bowl is cool to the touch.
- Switch to a paddle attachment and slowly add cubed butter while mixing on medium speed. Once all the butter is added, continue mixing until smooth and glossy in appearance. Add vanilla bean paste and peppermint extract and mix to combine.
- Remove approximately 1/2 of the buttercream and add powdered sugar and red gel food coloring to get your desired shade of red. Color will darken over time, but you can also remove 1/4 cup of colored buttercream and microwave it briefly (approximately 10 seconds is enough) to get a deeper color. Add the melted buttercream back to the rest and mix thoroughly to combine.
Assembly
- Place a sheet of parchment on top of cooled cake and turn out onto a cutting surface. Remove bottom parchment sheet. Using a ruler, measure and cut the sheet cake into 6 squares (3×2).
- Prepare 2 piping bags (no tips necessary), one with white buttercream and the other with red. Reserve enough white buttercream to do a rough crumb coat.
- Place one square cake layer on a cake board and pipe stripes of white and red buttercream (alternating) on top. Repeat with remaining layers, making sure that stripes are piped in the same direction on each layer. End with a top layer of cake. I find that 5 cake layers creates an even "box" shape (leaving 1 extra square for snacking). Make note of which direction the stripes are facing!** Crumb coat cake and chill for at least 30 minutes.
- Trim icing sheets (if needed – sometimes they come with little white borders that we don't need) and remove from backing. Apply to chilled cake, aligning the bottom and pressing gently up the cake to adhere. At the corners, trim excess icing sheet vertically, and fold over the top of the cake (it's ok that these overlap on top). Repeat on all sides until covered.
- For the bow, trim icing sheet into strips of desired bow width. Position one longer strip at the bottom-center of one side of the cake, and lay it across the top, and then over to the over side. Repeat on the remaining blank sides to create the criss-cross of the bow. You may need to use a tiny bit of leftover buttercream or edible glue to adhere these strips to the icing sheets covering the cake.
- Then, with two medium-length strips, create two loops that meet in the middle, and wrap the juncture with a smaller loop (seam side down) to create the bow. Use edible glue to adhere together. Cut another two smaller strips, and position to originate under the bow extending towards the edge. Again, use a tiny bit of leftover buttercream of edible glue to adhere.
Notes
Did you make this recipe?
I’d love to see! Follow and tag @pastrychefjeff on Instagram!